
Step 1. Getting the certificate
We can purchase the SSL certificate from the following SSL providers
- Godaddy
- DigiCert
- GeoTrust
- GlobalSign
- Comodo SSL
- RapidSSL
- SSL.com
OR, for testing purposes, we can generate a self-signed certificate
Before getting started, let us know the format of the SSL certificates:
- PKCS12: Public Key Cryptographic Standards is a password-protected format that can contain multiple certificates and keys; it's an industry-wide used format.
- JKS: Java KeyStore is similar to PKCS12; it's a proprietary format and is limited to the Java environment.
To know more about how SSL works please go to this link.
We can use either keytool or OpenSSL tools to generate the certificates from the command line. Keytool is shipped with Java Runtime Environment, and OpenSSL can be downloaded from here.
For our demonstration, let's use keytool.
keytool -genkey -alias localhost -storetype PKCS12 -keyalg RSA -keysize 2048 -keystore localhost.p12 -validity 365 -ext san=dns:localhost
This command will generate a key using the RSA cryptography algorithm. Arguments of the keytool program are stated below:
- -genkey: generates a key
- -alias localhost: defines the name of the key, here we have named 'localhost', which uniquely identifies your domain name
- -storetype PKCS12: this defines the format of the key that is stored as 'PKCS12'
- -keyalg RSA: used to specify the algorithm to be used is 'RSA'
- -keysize 2048: used to define the size of the key as '2048' bit
- -keystore localhost.p12: specifies the name of the file that stores the key is 'localhost.p12'
- -validity 365: it is used to set the expiration date of the key will be '365' days from now
- -ext san=dns:localhost: includes an X.509 extension for Subject Alternate Name (SAN)- a SAN is required so the certificated will be trusted by browsers on localhost
Note: The keytool program is available in JDK's bin directory, so you need to navigate to JDK_HOME\bin.

Step 2. Add the generated certificate file in your project
Copy and paste the generated key <localhost.p12> into the resource folder of the project structure as shown below.

Step 3. Setting up the SSL configurations in application properties
Add the necessary SSL configuration to the application.properties file.
httpPort = 8080
server.port=8443
server.ssl.key-store: classpath:localhost.p12
server.ssl.key-store-password: abcd123
server.ssl.keyStoreType: pkcs12
server.ssl.keyAlias: localhost
Step 4. Add the connectors configurations
Add connectors configurations and port redirection from default port to secured port.
@Configuration
public class ConnectorConfig {
@Value("${server.port}")
int httpsPort;
@Value("${httpPort}")
int httpPort;
/**
* This method is used to get Servlet Container
* @return ServletWebServerFactory
*/
@Bean
public ServletWebServerFactory servletContainer() {
TomcatServletWebServerFactory tomcat = new TomcatServletWebServerFactory() {
@Override
protected void postProcessContext(Context context) {
SecurityConstraint securityConstraint = new SecurityConstraint();
securityConstraint.setUserConstraint("CONFIDENTIAL");
SecurityCollection collection = new SecurityCollection();
collection.addPattern("/*");
securityConstraint.addCollection(collection);
context.addConstraint(securityConstraint);
}
};
tomcat.addAdditionalTomcatConnectors(redirectConnector());
return tomcat;
}
/**
* This method is used to get redirect Connector
* @return Connector
*/
private Connector redirectConnector() {
Connector connector = new Connector(TomcatServletWebServerFactory.DEFAULT_PROTOCOL);
connector.setScheme("http");
connector.setPort(httpPort);
connector.setSecure(false);
connector.setRedirectPort(httpsPort);
return connector;
}
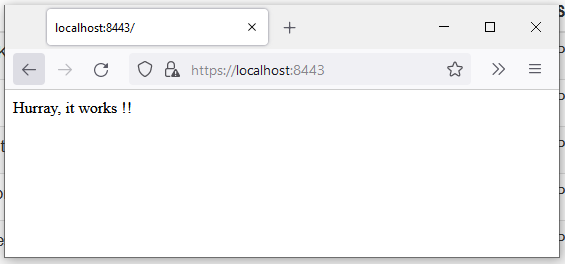
}Step 5. Output screens

Thanks for reading this article. I hope you understood well.