As stated in the title, we are going to demonstrate that how we can upload and retrieve files from the amazon s3 bucket in spring boot. For this, we must have an account on amazon web services (AWS). And the next thing you need to have is an IAM user that has programmatic access to the s3 bucket. Follow the steps below to create an IAM user and s3 bucket.

Table of Contents
- 1. Steps to create an IAM user in AWS with S3 bucket full access permission
- Step 1.1 Login to your AWS account
- Step 1.2 Set the user details
- Step 1.3 Set user permissions
- Step 1.4 Create a user group and set the access policy
- Step 1.5 Add user to the group
- Step 1.6 Set the tags (optional)
- Step 1.7 Review the user details and permission summary
- Step 1.8 Download the user credentials
- 2. See, how to create s3 bucket.
- 3. Set credentials in the application environment
- 4. Implementing the s3 file operations in the application
- Step 4.1 Set the application properties
- Step 4.2 Create an entity to persist file details
- Step 4.3 Create a repository for the entity
- Step 4.4 Create a bucket service
- Step 4.5 Create a controller to handle requests and responses
- Step 4.6 Create an HTML page to create an upload form and display uploaded images
- 5. Output Screens
1. Steps to create an IAM user in AWS with S3 bucket full access permission
Step 1.1 Login to your AWS account
Assuming that you have an account on AWS and log in to your account and go to the IAM users page using the link https://console.aws.amazon.com/iam/home#/users. Then click on Add user button as shown below in the image.

Step 1.2 Set the user details
Enter the user name and select the AWS access type as Programmatic access then click the Next: Permissions button as highlighted in the image.

Step 1.3 Set user permissions
Set the user permissions by adding the user to a user group that has permission to access the s3 bucket. Click on the "Create group" button to create a user group.

Step 1.4 Create a user group and set the access policy
Enter Group name and search s3 in Filter policies and select the policy "AmazonS3FullAccess" from the search result. Then click "Create group" see the below image.

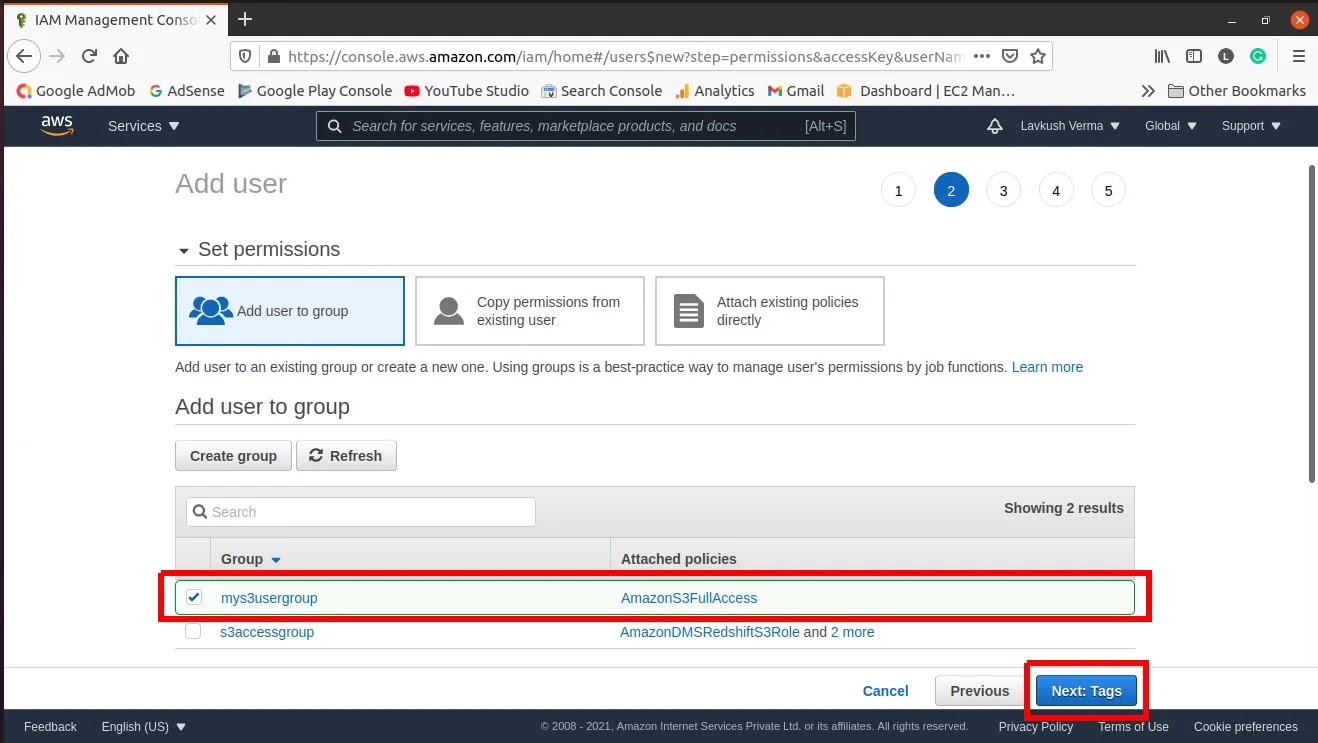
Step 1.5 Add user to the group
Select the newly created group to add the user to the group that has been created in earlier steps. You can add a user to multiple groups. Then click "Next: Tags".
Step 1.6 Set the tags (optional)
Tags are key-value pairs, it is optional, it is used to assign metadata to your AWS resources in the form of tags. Tags can help you manage, identify, organize, search for, and filter resources. You can create tags to categorize resources by purpose, owner, environment, or other criteria. After setting tags click on "Next: Review".

Step 1.7 Review the user details and permission summary
This step is confirmation of the details that you are provided in the previous steps. If you want to change anything click on the step number enclosed with circles. If everything is correct then click on "Create user".

Step 1.8 Download the user credentials
On successfully creating a user, AWS will generate an access key id and secret access key that is going to be used as credentials for the application which is going to access the s3 bucket.
Next, click on "Download.csv" and save this file securely.

2. See, how to create s3 bucket.
For creating a S3 bucket, search for s3 bucket in the AWS console or simply open the link https://s3.console.aws.amazon.com/s3/home.
And follow the steps shown in the images below.
Step 2.1 Click on the "Create bucket" button.

Step 2.2 Enter the bucket name and select bucket region.

Step 2.3 Set file accessibility for bucket items as public/private.
This is done by allowing public access or blocking public access. As shown in the below image.

If allowing public access, confirm to acknowledge that.
Step 2.4 Select Bucket Versioning.
Here we don't need bucket versioning, so keeping disabled

Step 2.5 Set file encryption.
Here we don't need encryption, so keeping disabled. And finally, click on "Create bucket".

3. Set credentials in the application environment
Create a text file without extention named "credentials" and paste this in .aws folder in home directory. This file could be found with the following path
In Linux: /home/<username>/.aws/credentials
In Windows: C:\users\<username>\.aws\credentials
In Mac: /users/<username>/.aws/credentials
credentials file content:
[default]
aws_access_key_id = AKIAVGOA4***********
aws_secret_access_key = VJEr+DHzzFESsUgp*********************
We can also keep this file in other locations then we need to mention the path in our application source code while initializing the s3bucket.
4. Implementing the s3 file operations in the application
Step 4.1 Set the application properties
Setting the necessary properties, we have used the database to store filenames that are uploaded in the s3 bucket to retrieve images.
spring.datasource.url=jdbc:mysql://localhost:3306/s3filebucketdemo
spring.datasource.username=root
spring.datasource.password=root
spring.datasource.driver-class-name=com.mysql.cj.jdbc.Driver
spring.jpa.hibernate.ddl-auto=update
spring.jpa.show-sql=false

s3.bucket.name=yourbucketname
s3.bucket.region=ap-south-1

spring.servlet.multipart.enabled=true
spring.servlet.multipart.max-file-size=2MB
spring.servlet.multipart.max-request-size=2MB
Step 4.2 Create an entity to persist file details
The @Getter, @Setter, and @NoArgsConstructor are defined in the Lombok dependency.
@Getter
@Setter
@NoArgsConstructor
@Entity
public class S3File {
    @Id
    @GeneratedValue(strategy = GenerationType.IDENTITY)
    private Long id;
    private String fileName;
    private String fileType;

    public S3File(String fileName, String fileType) {
        this.fileName = fileName;
        this.fileType = fileType;
    }
}
Step 4.3 Create a repository for the entity
public interface S3FileRepository extends JpaRepository<S3File, Long> {
    S3File findByFileName(String fileUrl);
}
Step 4.4 Create a bucket service
The S3BucketService will initialize the S3 bucket client at server startup, and have methods to perform file upload and retrieve.
@Log
@Service
public class S3BucketService {
    @Autowired
    S3FileRepository s3FileRepository;

    @Value("${s3.bucket.name}")
    String bucketName;
    @Value("${s3.bucket.region}")
    String region;
    String foldername = "images";

    AmazonS3 s3Client;

    @PostConstruct
    private void initialiseS3Bucket() {
        try {
            s3Client = AmazonS3ClientBuilder.standard()
                    .withRegion(region)
                    .build();
            log.info("s3Client initialized ");
        }catch (AmazonS3Exception ex){
            ex.printStackTrace();
        }
    }

    public boolean uploadFile(MultipartFile multipartFile) {
        try {
            File file = convertMultiPartToFile(multipartFile);
            String fileName = foldername+ "/" + generateFileName(multipartFile);
            String s3fileUrl = getEndpointUrl() + "/" + bucketName + "/" + fileName;
            if(uploadFileTos3bucket(fileName, file)){
                S3File s3file = new S3File(fileName,multipartFile.getContentType());
                s3FileRepository.save(s3file);
            }
            file.delete();
            return true;
        } catch (Exception e) {
            e.printStackTrace();
        }
        return false;
    }

    private File convertMultiPartToFile(MultipartFile file) throws IOException {
        File convFile = new File(file.getOriginalFilename());
        FileOutputStream fos = new FileOutputStream(convFile);
        fos.write(file.getBytes());
        fos.close();
        return convFile;
    }

    private String generateFileName(MultipartFile multiPart) {
        return multiPart.getOriginalFilename().replace(" ", "_")+new Date().getTime() + "-" ;
    }

    private boolean uploadFileTos3bucket(String fileName, File file) {
        try {
            PutObjectResult result = s3Client.putObject(new PutObjectRequest(bucketName, fileName, file)
                    .withCannedAcl(CannedAccessControlList.PublicRead));
            return true;
        }catch (Exception e){
            e.printStackTrace();
        }
        return false;
    }

    public String deleteFileFromS3Bucket(String fileName) {
        try {
            s3Client.deleteObject(new DeleteObjectRequest(bucketName, fileName));
            S3File s3File = s3FileRepository.findByFileName(fileName);
            s3FileRepository.delete(s3File);
            return "Successfully deleted";
        }catch (Exception e){
          return e.getMessage();
        }
    }

    public byte[] getFile(String filename) {
        byte[] bytearray = null;
        try {
            S3Object img = s3Client.getObject(new GetObjectRequest(bucketName,filename));
            bytearray= IOUtils.toByteArray(img.getObjectContent());
        }catch (Exception e){
            System.out.println("File fetch Error");
            e.printStackTrace();}
        return bytearray;
    }

    public String getEndpointUrl(){
        String endpointUrl= "https://"+bucketName+".s3."+region+".amazonaws.com";
        return endpointUrl;
    }
}
Step 4.5 Create a controller to handle requests and responses
The S3BucketController will handle the Thymeleaf-Html pages, file upload, and retrieve requests
@Controller
public class S3BucketController {

    @Autowired
    S3BucketService s3BucketService;
    @Autowired
    S3FileRepository s3FileRepository;

    @GetMapping
    public String homePage(Model model){
        model.addAttribute("myfiles",s3FileRepository.findAll(Sort.by(Sort.Direction.DESC,"id")));
        return "index";
    }

    @PostMapping("/uploadFile")
    public String uploadFile(@RequestPart(value = "file") MultipartFile file) {
        this.s3BucketService.uploadFile(file);
        return "redirect:/";
    }

    @GetMapping("/deleteFile")
    @ResponseBody
    public String deleteFile(@RequestParam(value = "filename") String filename) {
        return this.s3BucketService.deleteFileFromS3Bucket(filename);
    }

    @GetMapping(value = "/storage/**")
    public void thumbnail(HttpServletRequest request, HttpServletResponse response) throws Exception {
        String filename = request.getRequestURI();
        filename = filename.substring(9);
        byte[] bytes  = this.s3BucketService.getFile(filename);
        InputStream is = new BufferedInputStream(new ByteArrayInputStream(bytes));
        String mimeType = URLConnection.guessContentTypeFromStream(is);
        response.setContentType(mimeType);
        OutputStream outputStream = response.getOutputStream();
        outputStream.write(bytes);
        outputStream.flush();
        outputStream.close();
    }

}
Step 4.6 Create an HTML page to create an upload form and display uploaded images
Write the below code in the 'index.html' file.
<!DOCTYPE html>
<html lang="en" xmlns="http://www.w3.org/1999/xhtml" xmlns:th="http://www.thymeleaf.org">
<head>
    <title>easytutorials.live</title>
    <meta charset="utf-8">
    <meta name="viewport" content="width=device-width, initial-scale=1">
    <link rel="stylesheet" href="https://maxcdn.bootstrapcdn.com/bootstrap/4.5.2/css/bootstrap.min.css">
    <script src="https://ajax.googleapis.com/ajax/libs/jquery/3.5.1/jquery.min.js"></script>
    <script src="https://cdnjs.cloudflare.com/ajax/libs/popper.js/1.16.0/umd/popper.min.js"></script>
    <script src="https://maxcdn.bootstrapcdn.com/bootstrap/4.5.2/js/bootstrap.min.js"></script>
</head>
<body>
<div class="container">
    <h2 class="text-center">Amazon AWS S3 Bucket File Upload Example</h2>
    <div class="row">
        <div class="col-md-4"></div>
        <div class="col-md-4">
            <form method="post" action="/uploadFile" enctype="multipart/form-data">
                <div class="form-group">
                    <label>Select Image File</label>
                    <input type="file" name="file" accept="image/*" class="form-control">
                </div>
                <div class="form-group">
                    <input type="submit" value="Upload" class="btn btn-primary">
                </div>
            </form>
        </div>
    </div>
    <div th:if="${myfiles.size()>0}">
        <h2 class="text-success">Images from s3 bucket using public endpoint</h2>
        <div class="row">
            <div class="col-md-4" th:each="img:${myfiles}">
                <div class="container">
                    <p><a class="btn btn-danger" th:href="${'/deleteFile?filename='+img.fileName}">Delete</a></p>
                    <img th:src="${@s3BucketService.getEndpointUrl()+'/'+img.fileName}" style="max-height: 220px">
                </div>
            </div>
        </div>
        <h2 class="text-success">Images from s3 bucket using controller</h2>
        <div class="row">
            <div class="col-md-4" th:each="img:${myfiles}">
                <div class="container">
                    <p><a class="btn btn-danger" th:href="${'/deleteFile?filename='+img.fileName}">Delete</a></p>
                    <img th:src="${'/storage/'+img.fileName}" style="max-height: 220px">
                </div>
            </div>
        </div>
    </div>
</div>
</body>
</html>
5. Output Screens

Thanks for your time, I hope you understand well the above explanation.
And as always you can find the source code on GitHub